Container Tags
Tags are segments of code provided by analytics, marketing, and support vendors to help you integrate their products into your websites or mobile apps. With Google Tag Manager for WHMCS, you no longer need to add these tags directly to your WHMCS. Instead, you configure and publish tags and how they fire from within the Google Tag Manager user interface.
Google Tag Manager natively supports many Google and 3rd party tag configurations. This documentation will guide you to properly configure your container tags to correctly integrate your WHMCS with basic and enhanced tracking tag features like:
Google Tag
To measurement work properly, you need to implement a Google Tag in your container tags. Google Tag loads the associated stream with your Google Analytics in your pages. This tag will handle the automatically collected events for GA4.
The Global Site Tag (gtag.js) is now Google Tag. This is the equivalent to the old GA4 Configuration tag. Learn more about Configure Google Analytics 4 in Google Tag Manager.
To create a Google Tag in your container:
- On left menu, click
Tags -> New.

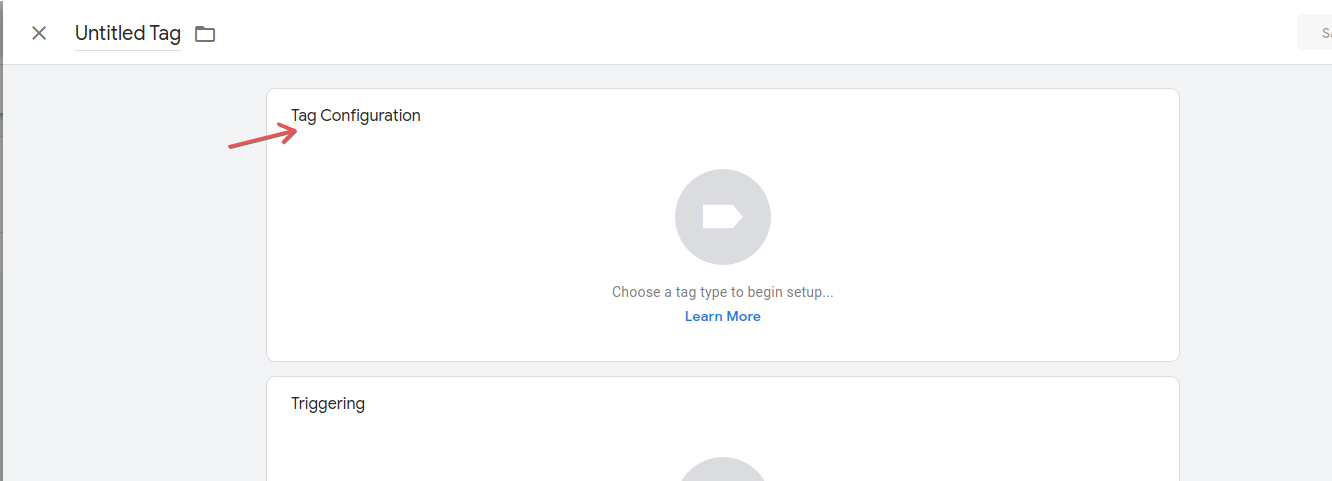
- In opened modal, click on
Tag Configurationblock.
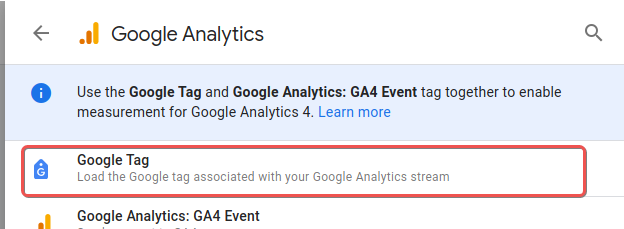
- Select the Google Tag under the Google Analytics option.
- In
Tag IDfield under Tag Configuration area, select the variable previously created{{Google Tag ID}}. On Triggering select Initialization - All pages.
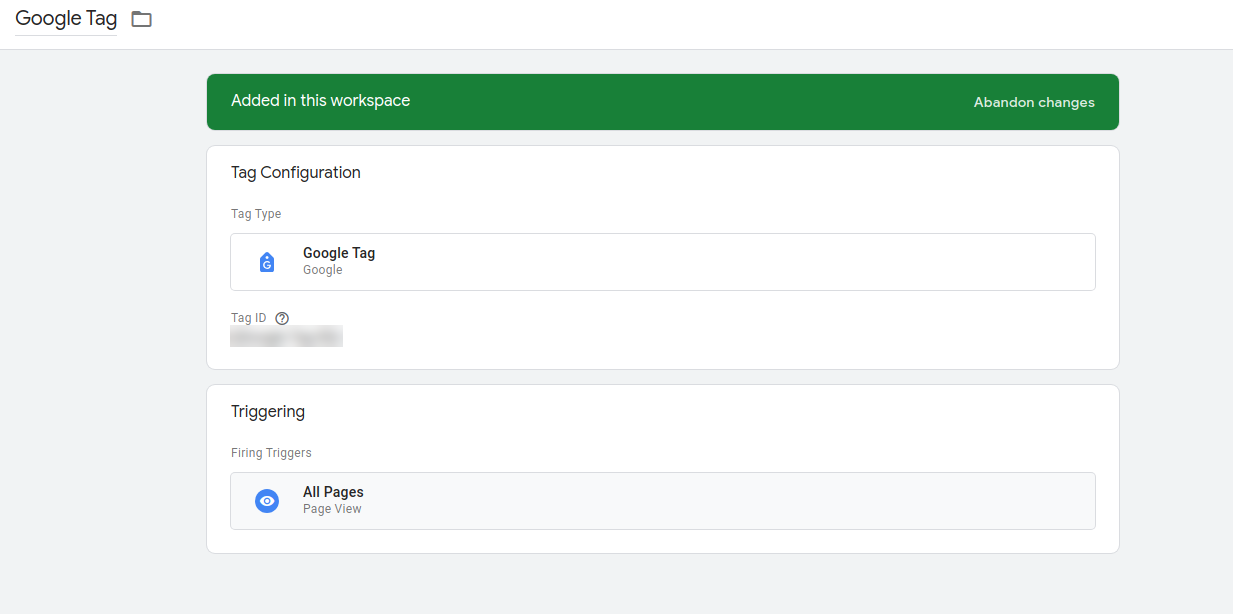
To ensure that the Google Tag can carrie all the needed information from data layers, define the Triggering to All Pages. The official Google Tag documentation recommends that the Google Tag fires before other triggers, using the Initialization - All Pages trigger, but this leads to tracking fire earlier than the data layers are loaded causing inconsistent data loaded in the Google Analytics.
See the official documentation to know more about Page triggers.
Shared event settings
To enhance your Google Tag with some user-provided data, you can set the Shared event settings with the variable {{Google Tag Event Settings}} to populate the properties defined to the Google Tag.
Setting the shared event will possible to you crate and use custom dimensions and metrics in your Google Analytics reports.
To enable this feature, click over the tab Shared event settings and select the variable {{Google Tag Event Settings}}.

Google Tag Event Settings variable has some properties defined in his documentation, but you are freely to add more properties to this variable to fit your needs.
Go to Google Analytics Custom Dimensions to learn more about custom dimensions and metrics.
GA4 Event Tags
The Google Analytics 4 Event tags lets you send the events built by WHMCS GTM module to Google Analytics, in addition to the events that are sent automatically or through enhanced measurement.
To create a Google Analytics: GA 4 Event tag:
- Click
Tags > New. - Click
Tag Configuration. - Select
Google Analytics: GA4 Event.
Ecommerce Event
GA4 Ecommerce event tracks ecommerce events during all the user journey. This tag is responsible to sent to GA4 enhanced data through the data layers tha will be rendered by WHMCS GTM module.
Follow the steps bellow to properly configure the GA4 Ecommerce Event tag:
Tag Configuration
- Tag Name:
WHMCS GA4 - Event - Ecommerce - Tag Type: Google Analytics: GA4 Event
- Measurement ID: select the variable
{{GA4 Measurement ID}}that you created earlier. - Event Name:
{{Event}}
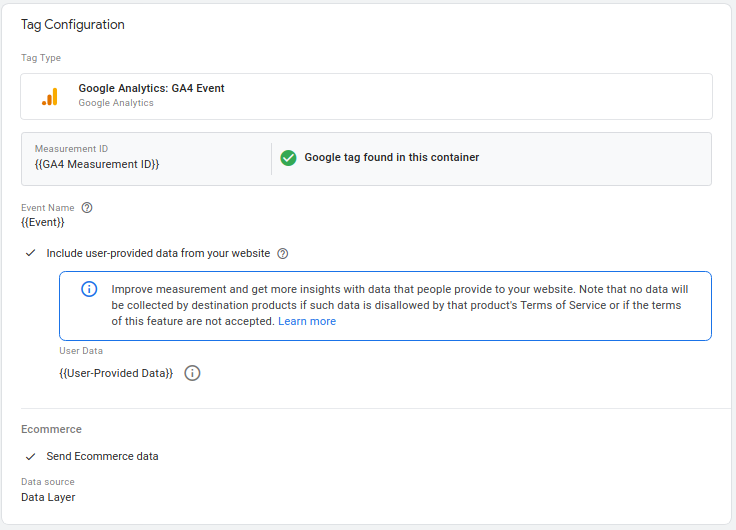
Include user-provided data
To help to improve and get more insights about your users, you can include user-provided data to your GA4 Ecommerce Event tag. This data will be sent to GA4 as user properties.
To enable this feature, click on the Include user-provided data from your website checkbox and under the User Data field select the variable {{User-Provided Data}}.

Send Ecommerce data
To send the ecommerce data to GA4, it is required that you check Send Ecommerce data and select as datasource Data Layer. This will ensure that the data layers created by WHMCS GTM module will be sent to GA4.

Triggering
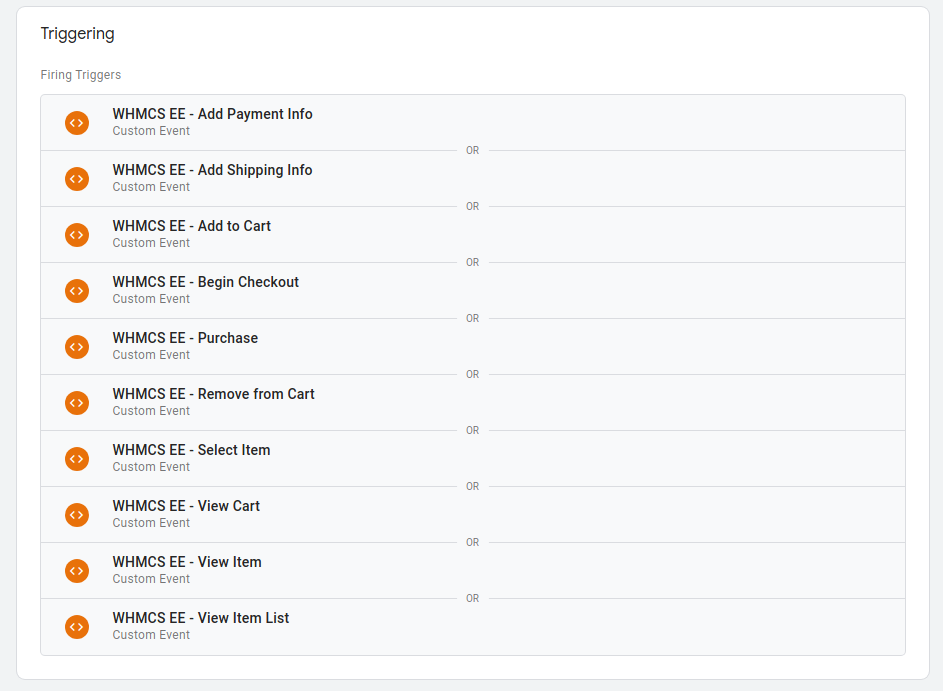
On the Triggering section, select all triggers listed below:
{{WHMCS EE - Add to Cart}}{{WHMCS EE - Begin Checkout}}{{WHMCS EE - Purchase}}{{WHMCS EE - Remove from Cart}}{{WHMCS EE - View Cart}}{{WHMCS EE - View Item}}{{WHMCS EE - View Item List}}{{WHMCS EE - Add Payment Info}}{{WHMCS EE - Add Shipping Info}}
General Event
GA4 General Event tag is used to track general events that are not related to ecommerce. This tag is responsible to sent to GA4 additional events performed by the user during the user journey such as login, logout, registration, etc.
Tag Configuration
- Tag Name:
WHMCS GA4 - Event - General - Tag Type: Google Analytics: GA4 Event
- Measurement ID: select the variable
{{GA4 Measurement ID}}that you created earlier. - Event Name:
{{Event}}
Include user-provided data
To help to improve and get more insights about your users, you can include user-provided data to your GA4 Ecommerce Event tag. This data will be sent to GA4 as user properties.
To enable this feature, click on the Include user-provided data from your website checkbox and under the User Data field select the variable {{User-Provided Data}}.

Triggering
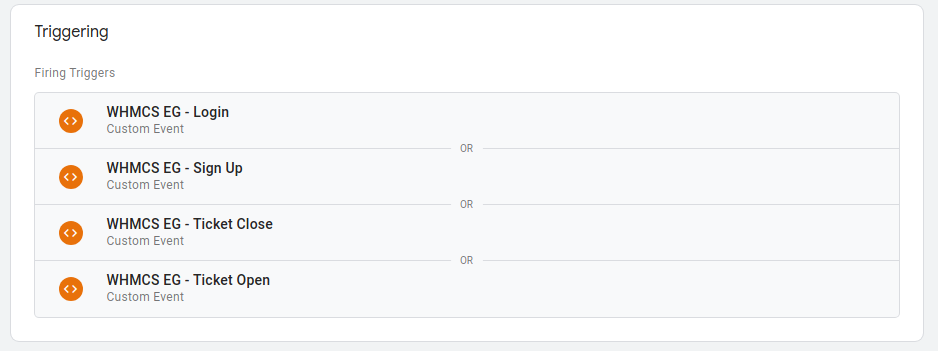
On the Triggering section, select all triggers listed below:
{{WHMCS EG - Login}}{{WHMCS EG - Sign Up}}{{WHMCS EG - Ticket Open}}{{WHMCS EG - Ticket Close}}
Google Ads Conversion Tracking Tag
Google Ads conversion tags help to build reports that show you what happens after a customer clicks on your ads – whether they purchased a product, signed up for your newsletter, called your business, or downloaded your app. When a customer completes an action that you've defined as valuable, these customer actions are called conversions.
To set up Google Ads conversion measurement, you will need:
- Google Ads Conversion ID in hands.
- Google Ads Conversion Label in hands.
- Create a new tag of type Google Ads Conversion Tracking.
- Define the required variables.
- Set the trigger.
Conversions measured by importing Google Analytics goals aren't supported for enhanced conversions. If you'd like to use enhanced conversions, consider setting up a Google Ads Conversion Tracking tag. More info here https://support.google.com/google-ads/answer/13262500
Creating Ads Conversion Tag
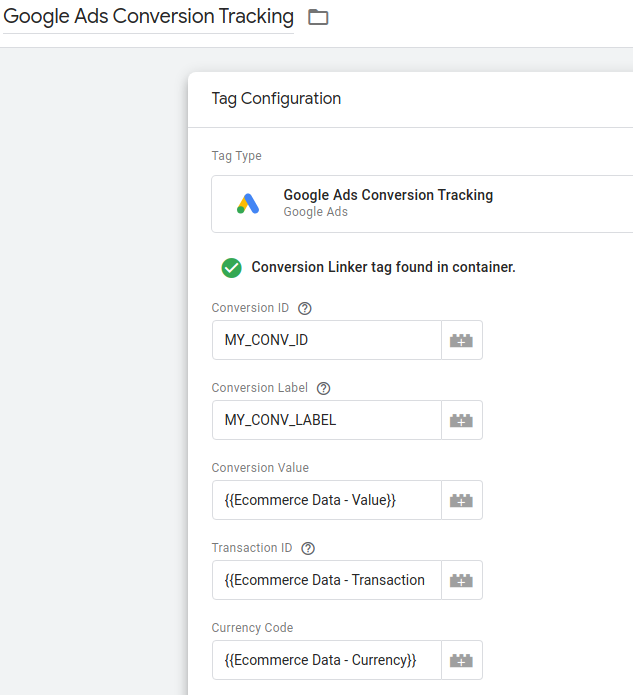
In the Tag Manager go to Tags and click on New button. In the modal page click on Tag Configuration and select the option Google Ads Conversion Tracking. Configure the follow parameters.
- Name:
Google Ads Conversion Tracking - Type:
Google Ads Conversion Tracking - Conversion ID:
<YOUR-CONVERSION-ID> - Conversion Label:
<YOUR-CONVERSION-LABEL> - Conversion Value:
{{Ecommerce Data - Value}} - Transaction ID:
{{Ecommerce Data - Transaction ID}} - Currency Code:
{{Ecommerce Data - Currency}}
Tag Configuration
Google Ads Conversion Tracking can receive product-level data and user-provided data provided by the WHMCS GTM module. With these properties set, you will be able to get more insights about your conversions and enable some advanced reports in Google Ads.
Product-level data
You can submit WHMCS cart data for sale conversions to get cart conversions reporting in Google Ads. To this, check the option Provide product-level sales data and as Data Source select the option Data Layer. WHMCS GTM module will provide the data layers with the cart information.

User-provided data
To enable this feature, click on the Include user-provided data from your website checkbox and under the User Data field select the variable {{User-Provided Data}}.

To get user data available at Data Layer, remember to set Enhanced Conversions for Web on module settings and define the User-Provided Variable.
Trigger
On the Triggering section select the firing trigger WHMCS EE - Purchase created before.

Save the new tag and publish your container to make changes effect.
Google Ads Remarketing Tag
Remarketing helps you reach people who have previously visited your website or used your mobile app. Previous visitors or users can see your ads when they browse websites that are part of the Google Display Network, or when they search for terms related to your products or services on Google.
Creating Ads Remarketing Tag
To create a Google Ads Remarketing tag go to Tags and click on New button. Click Tag Configuration and select Google Ads Remarketing. Configure the following parameters:
- Name:
Google Ads Remarketing - Conversion ID:
<YOUR-CONVERSION-ID> - Conversion Label:
<YOUR-CONVERSION-LABEL>
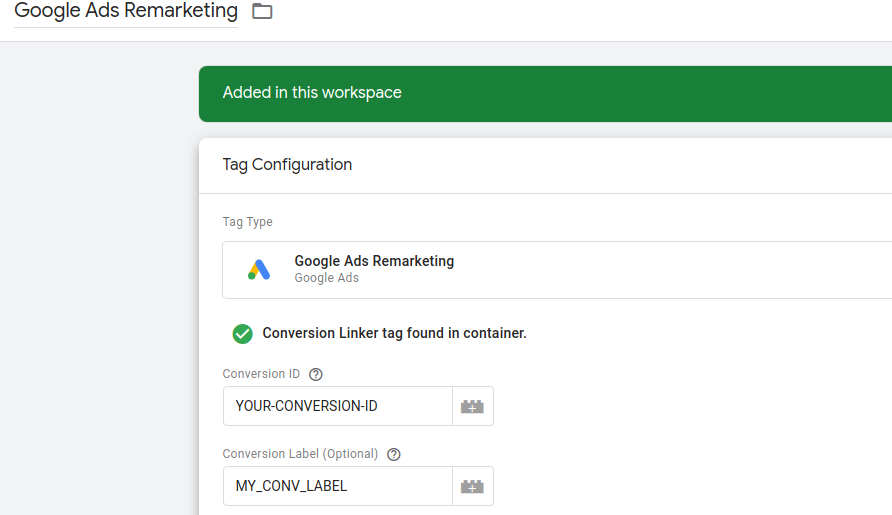
This is the basic configuration for the Google Ads Remarketing tag. Bellow we will proceed with some enhancements to this tag.
Tag Configuration
Google Ads Remarketing tag can be configured with some enhanced data provided by WHMCS GTM module. Setting these cofiguration will help you improve your remarketing campaigns and get more insights in Google Ads reports.
Dynamic Remarketing Event Data
To configure dynamic remarketing event data, check the option Send dynamic remarketing event data and set the following parameters:
- Event Name:
{{Event}} - Event Value:
{{ Event Value }} - Event Items:
{{Ecommerce Data - Items}}

User-ID
It is possible set your User-ID Attribution variable to the Google Ads Remarketing tag. This will help you to create data segments with User ID information.
To set the User-ID on the Google Ads Remarketing tag, select the variable {{User-ID Attribution}} under the User ID field.
To know more about data segments that use User ID to advertise see https://support.google.com/google-ads/answer/9199250
Trigger
Google recommends fire Ads Remarketing tag in certain important events, these events will be set as triggers for this tag.
On the Triggering section set the following triggers:
{{WHMCS EE - Add to Cart}}{{WHMCS EE - Begin Checkout}}{{WHMCS EE - Purchase}}{{WHMCS EE - Select Item}}{{WHMCS EE - View Cart}}{{WHMCS EE - View Item}}{{WHMCS EE - View Item List}}
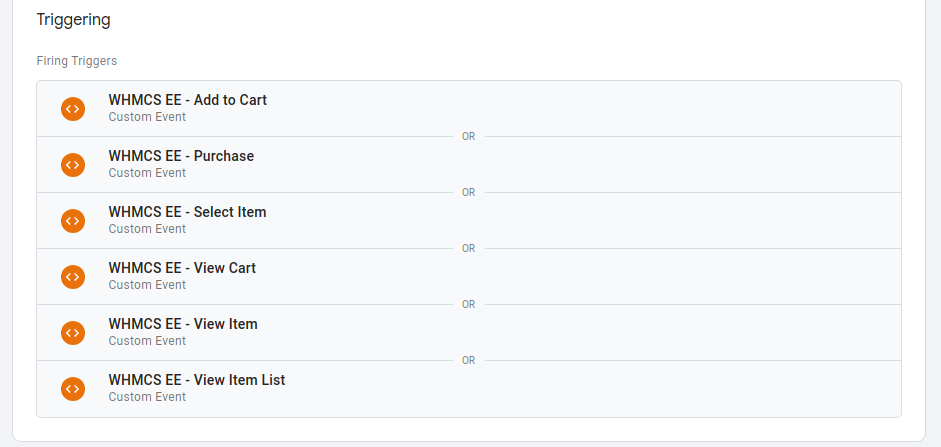
To learn more about Dynamic remarketing access https://support.google.com/google-ads/answer/7305793
Conversion Linker
Conversion linker tags are used to help tags measure click data so that conversions are measured effectively. Deploy a conversion linker tag on any page where visitors may land after they click an ad or promotion.
When people click on your ads, the URL of the conversion page on your website typically includes information about the click. When a site visitor takes an action that you’ve tagged as a conversion (e.g. when a Google Ads conversion tag is fired), the click information is used to associate that conversion with the click that brought the visitors to your site.
The conversion linker tag automatically detects the ad click information in your conversion page URLs, and stores this information in first-party cookies on your domain for web pages, and passes the data in URLs for AMP pages. If you use a conversion linker tag with Google Marketing Platform products, the conversion linker tag may also store unique identifiers in those cookies.
To set up the conversion linker tag go to Tags and click on New button. Click Tag Configuration and select Conversion Linker. Configure the following parameters:
| Name | Value |
|---|---|
| Tag Name | Conversion Linker |
| Linker Options | Enable linking on all page URLs |
| Triggering | All Pages |

Save the changes and publish your container to make changes effect.
After configure your Tag Manager container proceed to Google Analytics configuration to properly set your report information.